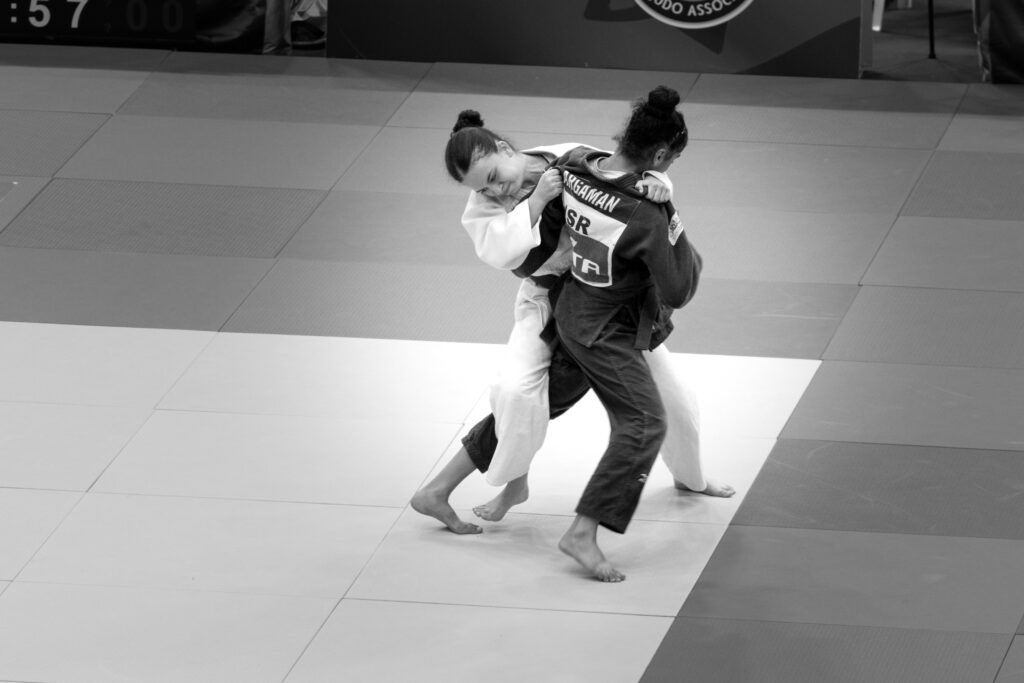
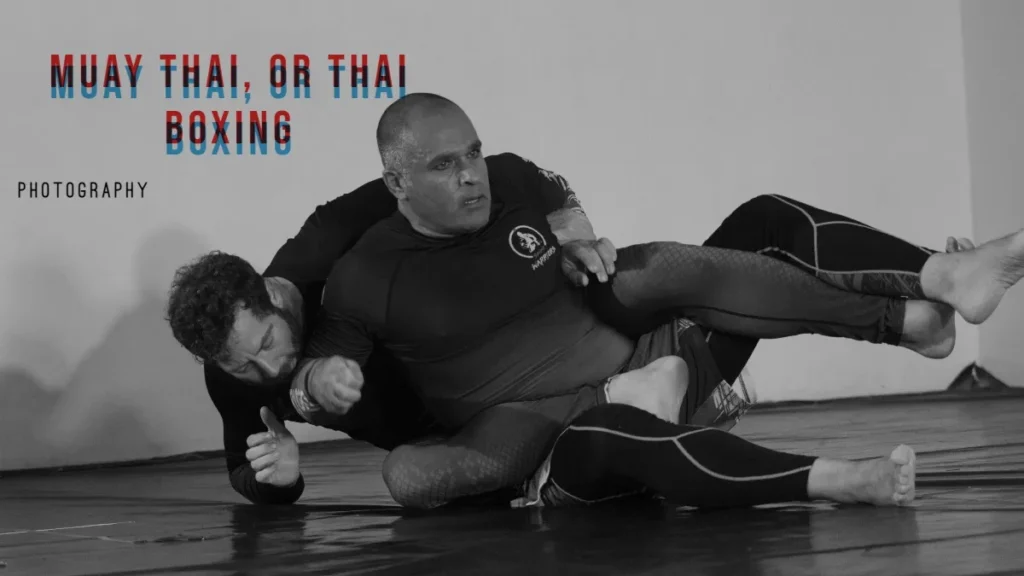
Capturing the raw intensity of martial arts through the lens, judo photography and Thai boxing imagery offer a dynamic fusion of discipline, motion, and emotion. Whether it’s the graceful throws of judo or the explosive strikes of Muay Thai, each frame tells a story of power, precision, and tradition.
This post explores how photographers freeze these fleeting moments—highlighting technique, timing, and cultural depth. From dojo to ring, discover how visual storytelling elevates combat sports and connects fans to the heart of the action. Ideal for enthusiasts, athletes, and creatives, this guide explores best practices, gear tips, and iconic shots that define martial arts photography.
Explore the art behind the fight and learn how to capture it like a pro.
Sports Photography Considerations
Autofocus Performance:
- Canon EF 100mm f/2.8L Macro IS USM: Features a fast and quiet Ring USM autofocus system, making it more suitable for capturing fast-moving subjects compared to the other two lenses.
- Sigma 105mm f/2.8 EX DG OS HSM: Equipped with a Hyper Sonic Motor, offering moderate autofocus speed, which may suffice for some sports scenarios.
- Tokina 100mm f/2.8 AT-X PRO D: Lacks a high-speed autofocus motor, resulting in slower focus acquisition, which can be a limitation in fast-paced sports photography.
Image Stabilization:
- Canon: Incorporates Hybrid IS, which is beneficial for handheld shooting and reduces motion blur.
- Sigma: Features Optical Stabilizer, aiding in handheld scenarios.
- Tokina: Does not include image stabilization, making it less ideal for handheld sports photography.
- Focal Length:
- All three lenses have focal lengths around 100mm, which may be limiting for sports photography, as it typically requires longer lenses (200mm and above) to capture distant action.
✅ Recommendations
- Canon EF 100mm f/2.8L Macro IS USM: Offers the best autofocus performance among the three, making it the most suitable for sports photography, especially in scenarios where you can be close to the action.
- Sigma 105mm f/2.8 EX DG OS HSM: A viable option for sports photography if budget constraints exist, but be prepared for moderate autofocus performance.
- Tokina 100mm f/2.8 AT-X PRO D: Best reserved for macro and portrait photography due to its slower autofocus and lack of image stabilization.
📸 Tips for Using Macro Lenses in Sports Photography
- Pre-Focus: Anticipate the action and pre-focus on a specific area where the subject is expected to move.
- Use High Shutter Speeds: To freeze motion, use shutter speeds of 1/1000s or faster.
- Stabilization: Use monopods or tripods to reduce camera shake, especially with lenses that lack image stabilization.
- Consider Teleconverters: For lenses like the Sigma, using teleconverters can effectively extend the focal length, providing better reach in sports scenarios.
For dedicated sports photography, lenses with longer focal lengths and faster autofocus systems are generally preferred. However, if you already own any of these macro lenses, they can still be utilized effectively in certain sports situations with the proper techniques.
Sigma 105mm Macro vs Tamron 90mm Macro – Which is Better for Close-Up Photography?
Tamron 90mm (especially VC version) has Vibration Compensation – great for handheld macro.
Sigma 105mm offers slightly longer working distance – helpful with insects.
Both deliver excellent sharpness at f/5.6–f/8.
Tamron is lighter and more compact; Sigma feels more robust in build.
Tamron’s autofocus can be slightly faster in some scenarios.
Is the Sigma 105mm Better Than the Canon 100mm L Macro?
The Canon 100mm L Macro features Hybrid IS, a significant benefit for handheld macro photography.
Canon is slightly sharper across the frame, especially at wide apertures.
Sigma is more affordable but lacks stabilization, unless you opt for the OS version.
Canon’s build is weather-sealed, and Sigma’s is sturdy but not fully sealed.
📸 Ultimate Guide: How to Photograph Judo Fights / Thai boxing Like a Pro |
|
|---|---|
| To capture stunning judo fight / Thai boxing photos, you need to master fast shutter speeds, wide apertures, and continuous shooting. Indoor sports like judo demand precision, timing, and an understanding of movement. Anticipating each throw, grip, and hold will help you freeze the most powerful moments of the match. | |
⚙️ Essential Camera Settings for Thai Boxing / Judo Photography |
|
| Shutter Speed | Judo is fast-paced, so a high shutter speed is crucial to avoid motion blur. Start at 1/500s and increase to 1/1000s or faster for peak action. To add creative flair, try 1/60–1/125s with panning for dynamic background motion while keeping the athlete sharp. |
| Aperture | Most judo matches take place indoors, so light is limited. Use a wide aperture (f/1.8–f/2.8) to let in more light and achieve a shallow depth of field. This makes your subject pop sharply against a softly blurred background. |
| ISO | Adjust ISO to balance exposure when using fast shutter speeds. Don’t hesitate to raise it to ISO 1600–6400 if lighting is poor. Modern cameras handle high ISO levels well, and a slightly grainy but sharp image is better than a dark or blurry one. |
| Autofocus (AF) | Set your camera to Continuous Autofocus mode (AI Servo for Canon, AF-C for Nikon/Sony) to track athletes in motion. Use a single focus point aimed at the fighter’s face or torso for maximum precision. |
| Shooting Mode | Begin with Shutter Priority mode (Tv or S) to lock your desired shutter speed. Once comfortable, switch to Manual mode for total creative control. |
| Burst Mode | Always use Continuous/Burst Shooting mode. Capturing multiple frames per second ensures you don’t miss the defining moment — whether it’s a throw, pin, or victory gesture. |
🎯 Positioning & Technique |
|
| Get Close to the Action | Stay near the mat for the most immersive perspective. Keep safety in mind — remain alert and avoid interfering with referees or athletes. |
| Experiment with Angles | Change your perspective: kneel for dramatic low-angle shots that emphasize power, or shoot from above to showcase technique and mat layout. |
| Anticipate Movements | Learn basic judo techniques and rhythm. Predict the action and press the shutter just as a throw begins, not after it’s completed. |
| Capture Emotion | Go beyond the throws — focus on emotion. Document determination, exhaustion, respect, and triumph to tell a more powerful visual story. |
| Tell the Whole Story | Combine action shots with environmental and candid photos — warm-ups, coach reactions, handshakes, and crowd energy — to create a complete judo event narrative. |
📷 Recommended Gear for Judo Photography |
|
| Camera | Any modern DSLR or mirrorless camera with manual controls can perform well. Look for models with strong high-ISO performance and fast autofocus tracking. |
| Lenses | A fast telephoto zoom lens (such as 70–200mm f/2.8) is ideal for flexibility from the sidelines. For portraits or close action, consider a prime lens with a wider aperture (f/1.8 or f/1.4) for superb background separation and low-light performance. |
| Bonus Tip | Always shoot in RAW format to have maximum editing flexibility in post-production. It’s invaluable when correcting white balance or lighting variations common in indoor gyms. |
🥋 How to Use Sigma 105mm f/2.8 & Tamron 17–35mm f/2.8 for Judo Photography |
|
|---|---|
| Lens | Best Usage in Judo Photography |
| 📸 Sigma 105mm f/2.8 (Macro / Telephoto Prime) |
|
| 🌍 Tamron 17–35mm f/2.8 (Wide-Angle Zoom) |
|
⚙️ Bonus Tips for Using Both Lenses Effectively |
|
|
|